Introduction↗
Welcome to the Azure AKS Kubernetes deployment security Workshop.
We won’t spend too much time on the presentation of AKS, the service that has been very popular in recent months.
In brief, AKS is Microsoft’s new managed container orchestration service. It is gradually replacing Azure Container service and focuses only on the Cloud Native Computing foundation (CNCF) Kubernetes orchestration engine.
In the last lab: Create a Kubernetes cluster with Azure AKS using Terraform, we have discussed the Azure Kubernetes Service (AKS) basics, the Infrastructure as Code (IaC) mechanism with a focus on Hashicorp Terraform and how to deploy a Kubernetes cluster with AKS using Terraform.
With this lab, you’ll go through tasks that will help you master the basic and more advanced topics required to secure Azure AKS Kubernetes cluster at the deployment level based on the following mechanisms and technologies:
- ✅Azure AD (AAD)
- ✅AKS with Role-Based Access Control (RBAC)
- ✅Container Network Interface (CNI)
- ✅Azure Network policy
- ✅Azure Key Vault
This article is part of a series:
- Secure AKS at the deployment: part 1
- Secure AKS at the deployment: part 2
- Secure AKS at the deployment: part 3
Assumptions and Prerequisites↗
- You have basic knowledge of Azure
- Have basic knowledge of Kubernetes
- You have Terraform installed in your local machine
- You have basic experience with Terraform
- Azure subscription: Sign up for an Azure account, if you don’t own one already. You will receive USD200 in free credits.
Implement RBAC to secure AKS at the deployment↗
In this part, we will continue our exploration of the use of Azure Active Directory (AAD) . We will detail the deployment steps with Terraform and Azure provider and Kubernetes in order to implement RBAC authentication mechanism to with Azure AKS Kubernetes.
ℹ️ Note
This implementation is based on the last Infra as Code lab: Create a Kubernetes cluster with Azure AKS using Terraform
1- Deployment of an AKS cluster integrated with Azure AD↗
Now that the prerequisites are done at the Azure AD level, we can deploy the AKS cluster using a Terraform config. For the AKS resource, we use azurerm_kubernetes_cluster.
The first step is to obtain the source code from Github. Likewise, you can simply update your own Terraform implementation as I will explain in the following steps.
This will clone the sample repository and make it the current directory:
|–⫸ git clone https://github.com/AymenSegni/azure-aks-k8s-tf.git
|–⫸ cd azure-aks-k8s-tf
Next, we need to update (use your preferred editor) the aks-cluster main resources to integrate AAD in the deployment.
|–⫸ vi src/modules/aks-cluster/main.tf
Inside, update the Terraform code as shown below, then save and close.
.gist table { margin-bottom: 0; }
resource “azurerm_kubernetes_cluster” “cluster” {
name = var.cluster_name
location = var.location
resource_group_name = var.resource_group_name
dns_prefix = var.dns_prefix
kubernetes_version = var.kubernetes_version
agent_pool_profile {
name = var.agent_pool_name
count = var.node_count
vm_size = var.vm_size
os_type = var.os_type
os_disk_size_gb = var.os_disk_size_gb
vnet_subnet_id = var.vnet_subnet_id
max_pods = var.max_pods
type = var.agent_pool_type
}
network_profile {
network_plugin = var.network_plugin
network_policy = “calico”
service_cidr = var.service_cidr
dns_service_ip = “10.0.0.10”
docker_bridge_cidr = “172.17.0.1/16”
}
service_principal {
client_id = var.client_id
client_secret = var.client_secret
}
role_based_access_control {
enabled = true
azure_active_directory {
client_app_id = var.AADCliAppId
server_app_id = var.AADServerAppId
server_app_secret = var.AADServerAppSecret
tenant_id = var.AADTenantId
}
}
tags = {
Environment = “Development”
}
lifecycle {
prevent_destroy = true
}
}
view raw aad-aks-cluster.tf hosted with ❤ by GitHub
The most important block for AAD integration is in the role_based_access_control block. Obviously, RBAC must be activated, so the enabled parameter must have the value true. Second, we must reference the AAD applications prepared in the previous sections, with the secret for the application server, the app id for the two applications as well as the tenant Azure Active Directory.
Hard coding this information is not a good practice, so we use Azure Key Vault for the value of these variables when calling the module, as shown below.
To properly secure access to the Key Vault, it’s of course necessary to define an access policy which gives Terraform only read access to the associated application for deployment.
The next stage, so is to update the root cluster deployment when calling the AAD integarted aks-cluster Terraform module
|–⫸ vi src/deployment/main.tf
Inside, update the Terraform code as shown below, then save and close.
.gist table { margin-bottom: 0; }
# Cluster Resource Group
resource “azurerm_resource_group” “aks” {
name = var.resource_group_name
location = var.location
}
# AKS Cluster Network
module “aks_network” {
source = ”../modules/aks_network”
subnet_name = var.subnet_name
vnet_name = var.vnet_name
resource_group_name = azurerm_resource_group.aks.name
subnet_cidr = var.subnet_cidr
location = var.location
address_space = var.address_space
}
# AKS IDs
module “aks_identities” {
source = ”../modules/aks_identities”
cluster_name = var.cluster_name
}
# AKS Log Analytics
module “log_analytics” {
source = ”../modules/log_analytics”
resource_group_name = azurerm_resource_group.aks.name
log_analytics_workspace_location = var.log_analytics_workspace_location
log_analytics_workspace_name = var.log_analytics_workspace_name
log_analytics_workspace_sku = var.log_analytics_workspace_sku
}
# AKS Cluster
module “aks_cluster” {
source = ”../modules/aks-cluster”
cluster_name = var.cluster_name
location = var.location
os_type = var.os_type
dns_prefix = var.dns_prefix
resource_group_name = azurerm_resource_group.aks.name
kubernetes_version = var.kubernetes_version
node_count = var.node_count
os_disk_size_gb = “1028”
max_pods = “110”
vm_size = var.vm_size
vnet_subnet_id = module.aks_network.aks_subnet_id
client_id = module.aks_identities.cluster_client_id
client_secret = module.aks_identities.cluster_sp_secret
diagnostics_workspace_id = module.log_analytics.azurerm_log_analytics_workspace
sp_id = data.azurerm_key_vault_secret.AKSSP_AppId.value
sp_secret = data.azurerm_key_vault_secret.AKSSP_AppSecret.value
aad_tenant_id = var.AzureTenantID
aad_server_app_secret = data.azurerm_key_vault_secret.AKS_AADServer_AppSecret.value
aad_server_app_id = data.azurerm_key_vault_secret.AKS_AADServer_AppID.value
aad_client_app_id = data.azurerm_key_vault_secret.AKS_AADClient_AppId.value
}
view raw aks-with-aad-main-deployment.tf hosted with ❤ by GitHub
As you will notice, it is also necessary to update the variable .tf files in the aks-cluster module and the main Terraform deployment configuration.
After making changes to your code, running the plan and apply commands again will let Terraform use its knowledge of the deployed resources (.tfstate) to calculate what changes need to be made, whether building or destroying.
Finally, get the cluster admin credentials using the az aks get-credentials command. In one of the following steps, you get the regular user cluster credentials to see the Azure AD authentication flow in action.
|–⫸ az aks get-credentials –resource-group myResourceGroup –name $aksname –admin
ℹ️ Note
The AKS cluster deployment with the AAD integration can be done through Azure CLI as shown below:
|–⫸ tenantId=$(az account show –query tenantId -o tsv)
|–⫸ az aks create –resource-group myResourceGroup –name $aksname –node-count 1 –generate-ssh-keys –aad-server-app-id $serverApplicationId –aad-server-app-secret $serverApplicationSecret –aad-client-app-id $clientApplicationId –aad-tenant-id $tenantId
2- Create RBAC↗
The next step is to associate the AAD identities on the Kubernetes cluster, using the Kubernetes Roles, ClusterRoles, clusterRoleBinding or RoleBinding objects. In our case, we are using existing roles:
- The cluster-role cluster-admin, which as its name suggests gives extended rights to the whole cluster,
- The cluster-role admin which gives extended rights but which associates with a namespace.
Roles define the permissions to grant, and bindings apply them to the desired users. These assignments can be applied to a given namespace, or across the entire cluster. For more information, see Using RBAC authorization.
1- Get the user principal name (UPN) for the user currently logged in using the az ad signed-in-user show command. This user account is enabled for Azure AD integration in the next step.

2- Create a YAML manifest named basic-azure-ad-binding.yaml and paste the following contents. On the last line, replace userPrincipalName_or_objectId with the UPN or object ID output from the previous command:
.gist table { margin-bottom: 0; }
apiVersion: rbac.authorization.k8s.io/v1
kind: ClusterRoleBinding
metadata:
name: contoso-cluster-admins
roleRef:
apiGroup: rbac.authorization.k8s.io
kind: ClusterRole
name: cluster-admin
subjects:
– apiGroup: rbac.authorization.k8s.io
kind: User
name: userPrincipalName_or_objectId
view raw basic-azure-ad-binding.yaml hosted with ❤ by GitHub
3- Create the ClusterRoleBinding using the kubectl apply command and specify the filename of your YAML manifest:
|–⫸ kubectl apply -f basic-azure-ad-binding.yaml
3- Authentication test↗
Now let’s test the integration of Azure AD authentication for the AKS cluster. The first step is to retrieve the identifiers. To do this, we use the az aks get-credentials command, after performing authentication on az cli. This implies, as it stands, that the person has access to the subscription in which the AKS cluster is located. However, once the config file is recovered, only the kubectl client is required.
After executing this first command, first with an account linked to the cluster-role cluster-admin, we then execute the command kubectl get pods, which requires rights at the cluster level, which is the case with the account present:
|–⫸ az aks get-credentials –resource-group myResourceGroup –name $aksname –overwrite-existing
|–⫸ kubectl get pods –all-namespaces
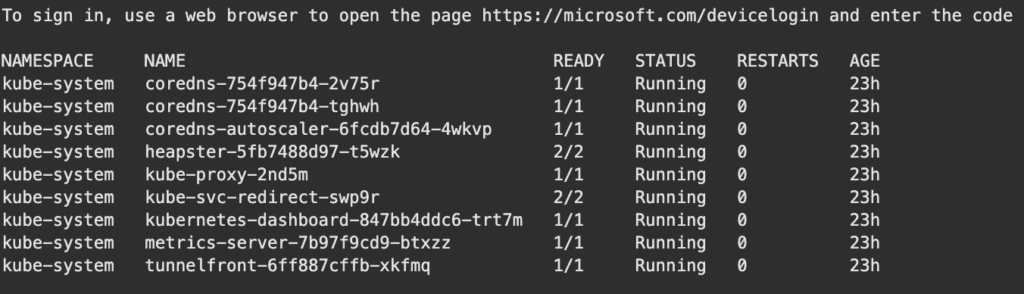
You receive a sign in prompt to authenticate using Azure AD credentials using a web browser. After you’ve successfully authenticated, the kubectl command displays the pods in the AKS cluster, as shown in the following example output:
Conclusion↗
In this part, we deployed an AKS cluster integrated with AAD to implement an RBAC, and then we successfully tested authentication with AAD users, not necessarily having direct rights to the resource in Azure. In a next part, we will implement Network Policies in order to secure the Azure AKS Kubernetes cluster at the deployment level.
Next steps↗
In a next chapter, we will implement security at the AKS cluster level using Network Policies.